Access and Update a Time Card
Each week that a user works, he or she
must access the Time Card page to enter his or her hours worked. A user must
enter his or her hours worked in the correct week. If a user submits the
incorrect hours worked, hours under the wrong job requisition number or
week-ending date, the manger must reject the time that the user submitted. The user
must re-submit his or her time card with the correct information to receive compensation.
1. Do one of the following:
|
If |
Then |
|
You are a consultant |
From the left menu, click the Time
Cards link to display one of the following depending
when you access the system. • If you log into the system Sunday,
Monday, or Tuesday then the time card for the
previous week-ending date displays. • If you log into the system Wednesday,
Thursday, Friday, or Saturday then the time card for the current weekending
date displays. Use the search field to display a time
card for another week-ending date. |
If a consultant works more than one
requisition, multiple time cards display. The consultant must enter his or her
hours worked for the correct job requisition to get paid.
2. In the time card, verify the correct
job requisition number and worksite location display. You must submit the hours
worked for the correct requisition. If you submit the hours worked for the
wrong requisition, the manager will reject the time card.
Consultants Not Working In
1. In the Week Ending Date field,
verify that you accessed the appropriate time card page. If necessary, update
the Week Ending Date field with the appropriate date to display the time card
you need.
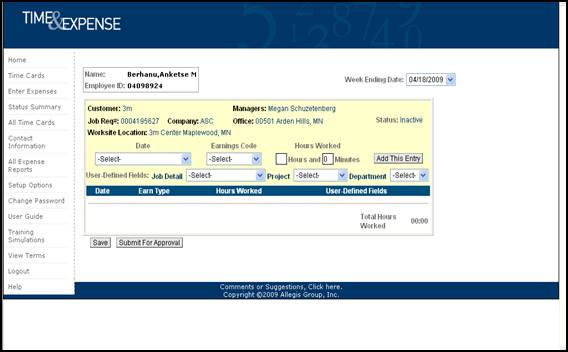
Time Cards page
2. In the Date field, select the
date for the hours worked. The date displays.
3. In the Earnings Code field,
select the appropriate earnings code for the hours worked.
For example, Regular
Pay.
4. In the Hours field, type the
number of hours worked for the day you selected.
5. In the Minutes field, type the
minutes worked for the day you selected.
T
6. If editable User-Defined Fields display,
update the fields as necessary to display the appropriate information for the
hours worked. Some User-Defined Fields may display as read-only. You cannot
update these fields.
7. Once you enter your hours worked for
the day you specified, click the Add This Entry button to add the
information to your time card.
8. If you need to update, copy, or remove
the information that displays on the time card, click the appropriate button. (See below)
You cannot update time card information if
you submitted the time card approval. Refer to Submit Time Cards for
further details.
|
Option |
Description |
|
Change |
To update the information for the date
you selected. The time card information displays in the editable section of
the time card. Repeat steps 2-8 to update the time as necessary. |
|
Copy |
To copy the information that you entered
for a date on the time card and insert the
copy of the information for a different date on
the time card. The time card information displays in
the editable section of the time card. Repeat steps 2-8 to update the time as necessary. |
|
Remove |
To remove the information from the time
card. If necessary, repeat steps 2-8 to update
the time card appropriately. |
9. Repeat steps 2-8 for each day worked.
10. Verify that the Totals section
displays the total number of hours and minutes worked at the appropriate
earnings codes.
11. Click the Save button to save
the time card. You can save the hours worked without submitting the
information. When you re-access the Time Card page the saved information
displays.
12. If you need to submit the time card
for approval, click the Submit for Approval button. When you click this
button, the time card saves automatically. Refer to Submit Time Cards for
further details.
13. Refer to Perform Additional Time
Card Functions in this document to perform additional functions for the
time card.
Hours Calculator
Choose the Calculator image to determine the amount of hours worked. The visibility of the Calculator image is determined by your Operating Company.
1.
Click on the Calculator image.![]()
2. Enter the Start Time (example 08 16 AM).
3. Enter the End Time (example 03 47 PM). Please note, AM and PM must be indicated in order to calculate the correct amount of hours.
4. Enter the amount of time for the duration of your meal break, if applicable (example 00 30 for a 30 minute lunch break).
5. Click the Calculate button to view the results of the calculation. The calculator will automatically remove your meal break duration, if applicable.
6. Click the Reset button to clear the information.
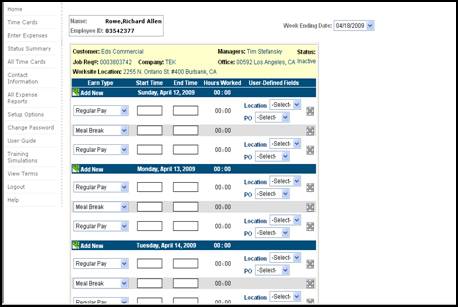
Consultants Working In California
1. In the Week Ending Date field,
verify that you accessed the appropriate time card page. If necessary, update
the Week Ending Date field with the appropriate date to display the time card
you need.
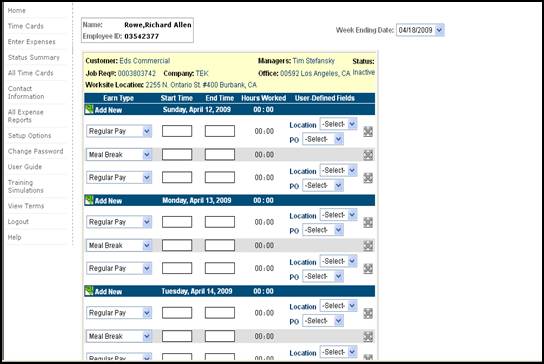
Time Cards page
2. Beginning
entering time on the day/date hours were worked.
3. In
the Earnings Type field, select the appropriate earnings code for the hours worked for example, Regular Pay.
4. In
the Start Time field, type the time when you started to work. You must enter time
as HH:MM (two digits for the hour and
two digits for the minutes) and include AM or PM. For
example, 09:30 AM.
5. In
the End Time field, type the time when you stopped working. You must enter time
as HH:MM (two digits for the hour and two digits for the minutes) and
include AM or PM. For example,01:00 PM.
6. When entering meal breaks the following rules apply:
- Greater than 6 hours a 30 minute meal break is required
- 10 – 12 hours 2nd meal break required unless 2nd meal break waiver is signed
- 12-15 hours a 30 minute meal break is required – waiver is not optional.
-
15 + hours 3rd meal break is
required.
7. If
editable User-Defined Fields display, update the fields as necessary to
display the appropriate information for the hours worked. Repeat this step for
each editable UDF. Some User-Defined Fields may display as read-only.
8. Once
you enter the hours worked for the day you specified, select the drop down
arrow to select the appropriate information for User-Defined Fields.
Time Cards page
9. Click
the Remove ![]() button to delete a line item in the time card
button to delete a line item in the time card
10. Click
the “Add New” button ![]() to insert a line item below the day/date hours Repeat steps 2-8 for each day worked.
to insert a line item below the day/date hours Repeat steps 2-8 for each day worked.
11. Verify that the Totals section
displays the total number of hours and minutes worked at the appropriate
earnings codes.
Option Description
12. Click the Save button to save
the time card. You can save the hours worked without submitting the
information. When you re-access the Time Card page the saved information
displays.
If you do not
select a UDF value in a UDF label field when you try to save or submit your
time card then a warning displays. You can select the Continue button to
continue the submittal or the Cancel button to cancel the submittal and
update your time card appropriately.
13. If you do not have a 2nd meal break and you have worked more than 10 hours or less than or equal to 12 hours you will be prompted to complete a 2nd meal break waiver. The waiver is applicable if you and your manager agree to waive the 2nd meal break. You will see a message “Have you and your manager agreed to waive the 2nd meal break”
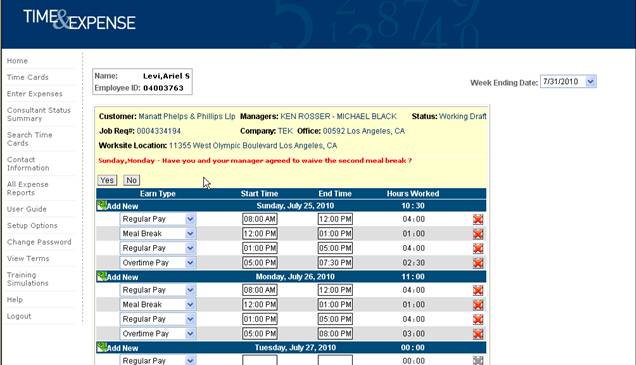
14. If you choose yes, the California 2nd meal break waiver form will present for electronic acknowledgement. You will select the day(s) that you would like to waive and click the waive button to acknowledge.
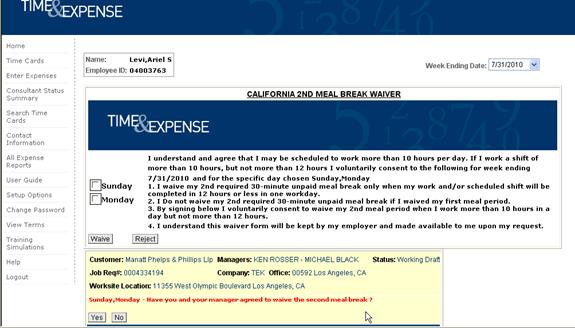
15. If
you choose No, or do not select to waive the California 2nd meal
break waiver, Time & Expense will not allow you to submit your timecard
unless a 2nd meal break is entered. 
16. If you need to submit the time card for
approval, click the Submit For Approval button.
When you click this button, the time card saves automatically. Refer to Submit
Time Cards for further details.
17. Refer to Perform Additional Time Card Functions in this document to perform additional functions for the time card.